
| N | E | S | W |
|---|---|---|---|
| 1♠ | |||
| P | 4♣* | P | 4♦ |
| P | 4♥ | P | 4NT |
| P | 5♦ | P | 5♥ |
| P | 6♠ | P | P |
| P |
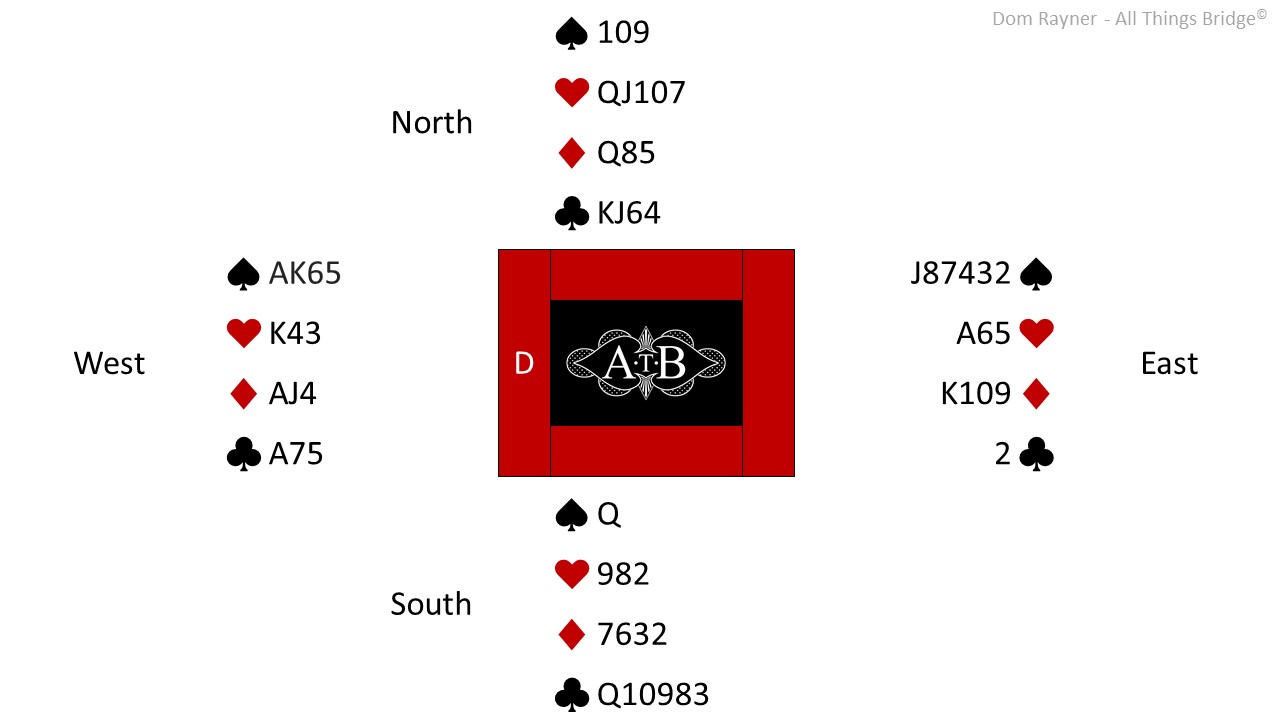
With the heart loser unavoidable, you require the spades to break 2-1 to avoid a loser there. If the spades are 3-0 you are off, there is no way to avoid it, so in that respect there is no reason to worry about it! When the spades do break 2-1 (a 72% chance) then you only need to concern yourself with the potential diamond loser. With this suit combination it is best to finesse as dropping the ♦Q is less than 50%, however who should you finesse? You could play low to the ♦J hoping South has the ♦Q or low to the ♦10 hoping that North is the culprit. In this scenario it is actually better to get your opponents to lead the suit for you, then you can simply play low in 2nd seat and win in 4th seat. You are guaranteed 3 diamond tricks if the opponents lead this suit for you so what you need to do here is an ‘endplay’. To perform an endplay you need eliminate all safe lead options for the opponents and then ‘throw them in’ by relinquishing the lead.
So, win ♥A on dummy and cash ♠AK in hand, breathing a sigh of relief when they break. Now play ♣A and ruff a club on the table, then a heart back to your hand with the ♥K and ruff your final club on dummy. What you have performed here is a partial elimination, because if the opponents gain the lead, they can no longer leads clubs safely (you will ruff in one hand and discard your potential diamond loser in the other). You have stripped the opponents of their trumps already, so when they gain the lead now they can only lead hearts safely, as diamonds would give you the 3 tricks require there. Time to eliminate hearts and complete the elimination process. In this hand you can both eliminate hearts and lose the lead all in one trick, thus performing the ‘throw in’ and elimination simultaneously. Simply, lead your losing heart, allowing North or South to win their deserved heart trick. If you have followed the play correctly you will now be in this position:
♠ J8
♥ –
♦ K109
♣ –
♠ 65
♥ –
♦ AJ4
♣ –
If the opponent who won the last trick leads a heart or club you can ruff in one hand discard your diamond loser in the other, you can then ruff the third round of diamonds for 12 tricks. If they instead opt to lead a diamond you simply play low in 2nd seat and you are guaranteed to either beat the ♦Q or win a smaller diamond, thus taking the finesse for you! A classic endplay, executed to perfection.
If the opponents had led a diamond a trick 1 they would have done all of this hard work for you, but other than that they cannot really influence this hand at all. If you were not aware of this potential endplay you would have had to guess who to finesse, resulting in success 50% of the time (unless you are a much better guesser than I am!).